As I finally released the alpha version of LevelFX – my brand-new 2D platformer creation kit – I’ve thought it was a good idea to write down step-by-step instruction on how to actually use it to create your first level.
So here you go. If you haven’t downloaded LevelFX already, it’s time to do so. After that you are fully prepared to start building. In no more than a few minutes you are going to play your first self-made level, I promise.
Overview
Let’s start with a short overview of the user interface of the LevelFX Studio.
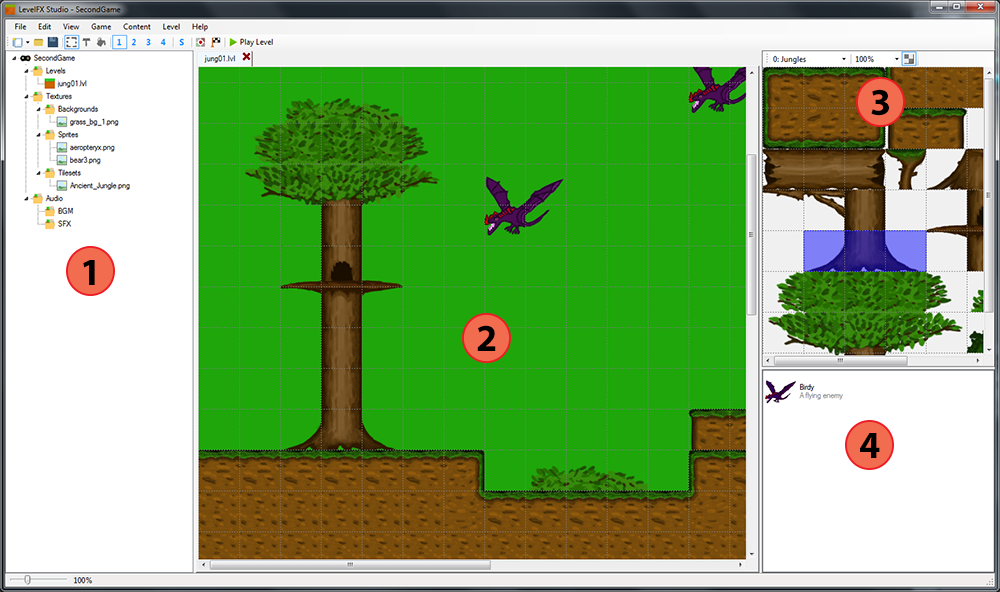
- Project Tree
- The Level
- Tile Selector
- Sprites List

- Selection Tool: Used for selecting tiles or sprites
- Brush Tool: Used for adding tiles or sprites
- Fill Bucket Tool: Used for filling a contiguous area with the selected tile
- Layer Selection: Determines the current layer to work on
- Edit Start Point/Goal Point
Creating a new project
- Go to File > New > Project…
- Enter a name for your project and the location where all of its files should be saved. It’s recommended to create an own folder for your project.
- Press OK
Now a bunch of folders were created which can be seen in the project tree on the left panel.
The folder Levels contains of course your level files. The folder Textures contains all the graphical content of your game, divided into backgrounds, sprites and tilesets. The folder Audio contains sound files for the background music (BGM) and the sound effects (SFX) in your game.
Adding content
Before you can build your level, you are going to need some graphics first. You can either use some of the graphics brought with LevelFX, search online or create your own.
- Right click on the specific folder you want to add content to (e.g. Backgrounds)
- Go to Add File…
- Select your desired file from the file chooser
By the way, the project tree shows basically the same as your project folder in the file system. So instead you can also copy-paste your files directly into the folders in your file explorer. After doing that you will have to refresh the project tree in LevelFX (right click somewhere in the project tree and go to Refresh).
Adding Tilesets
Tilesets are graphics which contain a collection of the tiles you will use to build your level. The tiles are organized in a square grid where the constant size of each square is called the tile size.
In LevelFX, Tilesets are created within the Tileset Editor and can be used in any level throughout the game then.
- Open the Tileset Editor: Content > Tileset Editor…
- Press the Button Add new Tileset in the toolbar
- Enter a name for your tileset
- Select a graphics file from the list (all files in your project’s “Tilesets” folder will be listed)
- Enter the tile size (This is usually a power of 2, like 16px, 32px or 64px. If you don’t know it you will have to find it out by using an image editing software, for example. The tile size of tileset graphics brought with LevelFX all are 64 pixels.)
- Optionally enter an offset (Sometimes tileset graphics have a small margin between the tiles. In this case you have to define an offset.)
- Press OK
Now that you’ve added your first tileset it will show up in the tileset editor. With the drop-down box in the toolbar you can select which tileset to edit.
The next step is to edit the behavior of the individual tiles, if desired. In LevelFX each tile has a certain behavior, called Touch Event. The touch event describes how the player is interacting with the tile.
Here is a list of the supported touch events with a short description
- Solid: Player can stand on this, can’t be passed in any direction
- Passable: Completely blank, can be passed from all direction, used for decoration
- Ledge: Player can stand on it and can pass it from below
- Death: Player dies
- Hurt: Player loses a hit point
- SlopeLeft/SlopeRight: Slope tiles (depending on tile size, still buggy)
- Bounce: Player bounces off when jumping on this
- BoostLeft/BoostRight: Player gets a speed boost in the given direction
- Sticky: Player can’t walk on this
Now to change the touch events left click on a tile to select it or drag your mouse around to select multiple tiles at once. Then in the Touch Event drop-down box select the event you want.
Once you are done editing the tileset you can press OK in the tileset editor to save it.
Building a level
Now that you have added a tileset you can finally start with the level.
- Go to File > New > Level… (or right-click on the Levels folder in the project tree)
- Enter the file name for your level and the width and height in tiles
- Press OK
Your blank gray level should now show up in the center of the window and in your Levels folder a new file should appear. By double-clicking on a level file you open it up in a new tab.
Let’s start to fill your level with some tiles.
- Select one or more tiles in the tile selector
- Switch to the brush tool
- “Draw” your tiles by holding left mouse
- Remove tiles by holding right mouse
In the toolbar you will notice some buttons with numbers from 1-4 and one with an ‘S’. With these you can select the layer on which to draw. 1-4 are the foreground tile layers (layer 4 is topmost), whereas S is the sprite layer (described later). You can also use the (1-5) number keys on your keyboard as a shortcut to switch between the layers.
Adding a background
If you are already bored of the grey back color it’s time to add some background images to your level.
- Open Level > Background Settings…
- Select the layer in the left panel
- Select a graphics file from the list
- Enter the additional background properties (Repeat X/Y to repeat the image throughout the entire level; Scrolling Speed is the factor of speed which the background is scrolling with. By using different values you can create a parallax scrolling effect)
- Press Save
- Start over with another layer if you like
- Edit the level’s background color by pressing the color button
- Close the window
Playing the level
Before you finally start playing the level you just built, you have to set a start point and optionally a goal point for your level. This can be done via the two buttons in the toolbar: Set Level Entry Point and Set Level Goal Point.
Now it’s time:
- Press the button Play Level in the toolbar (this will also automatically save your level)
- Enjoy playing!
Adding Sprites
Maybe your level is already great, maybe it’s not. In either case sprites can add a lot more liveliness to any level. In LevelFX, sprites are dynamic objects which are mainly enemies, hazards and other mechanics or, generally said, objects that move or perform any action. Sprites will most likely have a texture (which can be animated) and a certain behavior (e.g. walking around, jumping around, flying etc.).
As with the tilesets, sprites have to be added first to your project, this time in the Sprite Editor.
- Open Content > Sprite Editor…
- Press Add…
- Enter a name and optionally a description for your sprite
- Select a graphics file from the list (again only the files in appropriate folder (this time Sprites will be shown)
- Enter the frame width and frame height. For non-animated graphics that will be just the dimensions of the image. For animated sprite sheets this will the width and height of one single frame. This will be used to display it correctly as well as to determine the hit box of the sprite in the game.
- If you use animation you have to enter some more data
- Frame Count: Total number of frames the animation should cycle
- Start Frame: Index of the frame where to start (starts with 0)
- Number of Rows: In case of multi-line sprite sheets this will be the number of rows (otherwise leave it 0)
- Select a behavior for your sprite. In the future this will be replaced with a whole lot of customization tools, but for now you have to stick with these few preset behaviors.
- Press Save
- Close the window
Now your created sprite should have been added to the sprites list in the right panel. Let’s add it to your level:
- Select the sprite layer to draw (‘S’-button in the toolbar)
- Make sure you have selected the brush tool
- Select your sprite in the sprites list
- Left click somewhere in the level to place it
- Right click to remove it
Adding a custom player character
If you don’t like the default character or you have other plans you can create your very own player character. You can declare custom graphics, easily create different animations and customize a whole lot of behavior like the player’s physics.
- Open Content > Character Editor…
- Select Use Custom Character. If you haven’t already created a character, a new dialog should open
- Select a graphics file (only files from the Character folder will be shown)
- Enter the frame width and frame height (same as with sprites)
- Press OK
Below you should now see your texture (sprite sheet) with a grid according to your frame width and height. Let’s create some animations:
- Select an animation cycle in the drop down box on the left side. (idle = player does nothing, run = player is moving horizontally, jump = player is moving upwards, fall = player is moving downwards, duck = player ducks by pressing the down key)
- Drag your mouse to select the area of frames the animation should loop through (if you don’t want animation, you can just select one frame)
- Press Save on the left side
- Repeat for the other animation cycles
Now that we’ve set up the graphical appearance of our player, we want to change some behavior as well.
- Switch to the Physics tab
- Modify any value as you like (might have to mess around a bit to get the right values)
- Press OK at the bottom of the window to save the character.
You can go back to the default character any time by selecting Use Default Character in the Character Editor.
Finally
Mess around a bit with your level and be sure to press Play whenever you feel like playing it.
There are some features which I haven’t explained here and of course a whole lot of new features will be coming soon. This article will be updated whenever there are major changes.
Keep up and have fun designing your own levels!